Ticket Flow Setting Guide
# Ticket Flow Setting Guide
——Set a trigger to realize auto flow processing of ticket triggering node and process batch tickets regularly according to the natural time
# Role of Ticket Flow Setting
You can configure the flow trigger and scheduled trigger through the ticket flow setting to judge ticket conditions at the ticket processing node or at each hour using the trigger and execute relevant actions to process the ticket. Reasonable configuration of triggers can improve the efficiency of ticket processing and flow.
# Preparation
● Understand the completion workflow of the ticket system, and be familiar with the basic functions of each module of the ticket as well as the meaning of the ticket list, ticket details and other fields.
● Create custom fields, ticket categories, ticket templates, submission templates or other ticket related attribute contents to help you understand the trigger nodes, determination conditions and execution actions of ticket flow trigger and scheduled trigger.
● Create and process several tickets as test objects of triggers.
# Working Principle of Triggers
The trigger consists of trigger event, trigger condition, and execution action. When you operate the ticket or a specific time (trigger event) is reached, the system will judge the condition (trigger condition), automatically execute the set operation (execution action) for the ticket that meets the condition, and generate the operation record. The flow trigger can be triggered only when certain actions are performed, while the scheduled trigger is triggered at every hour (server time).
# Trigger Configuration
# ● Add Trigger
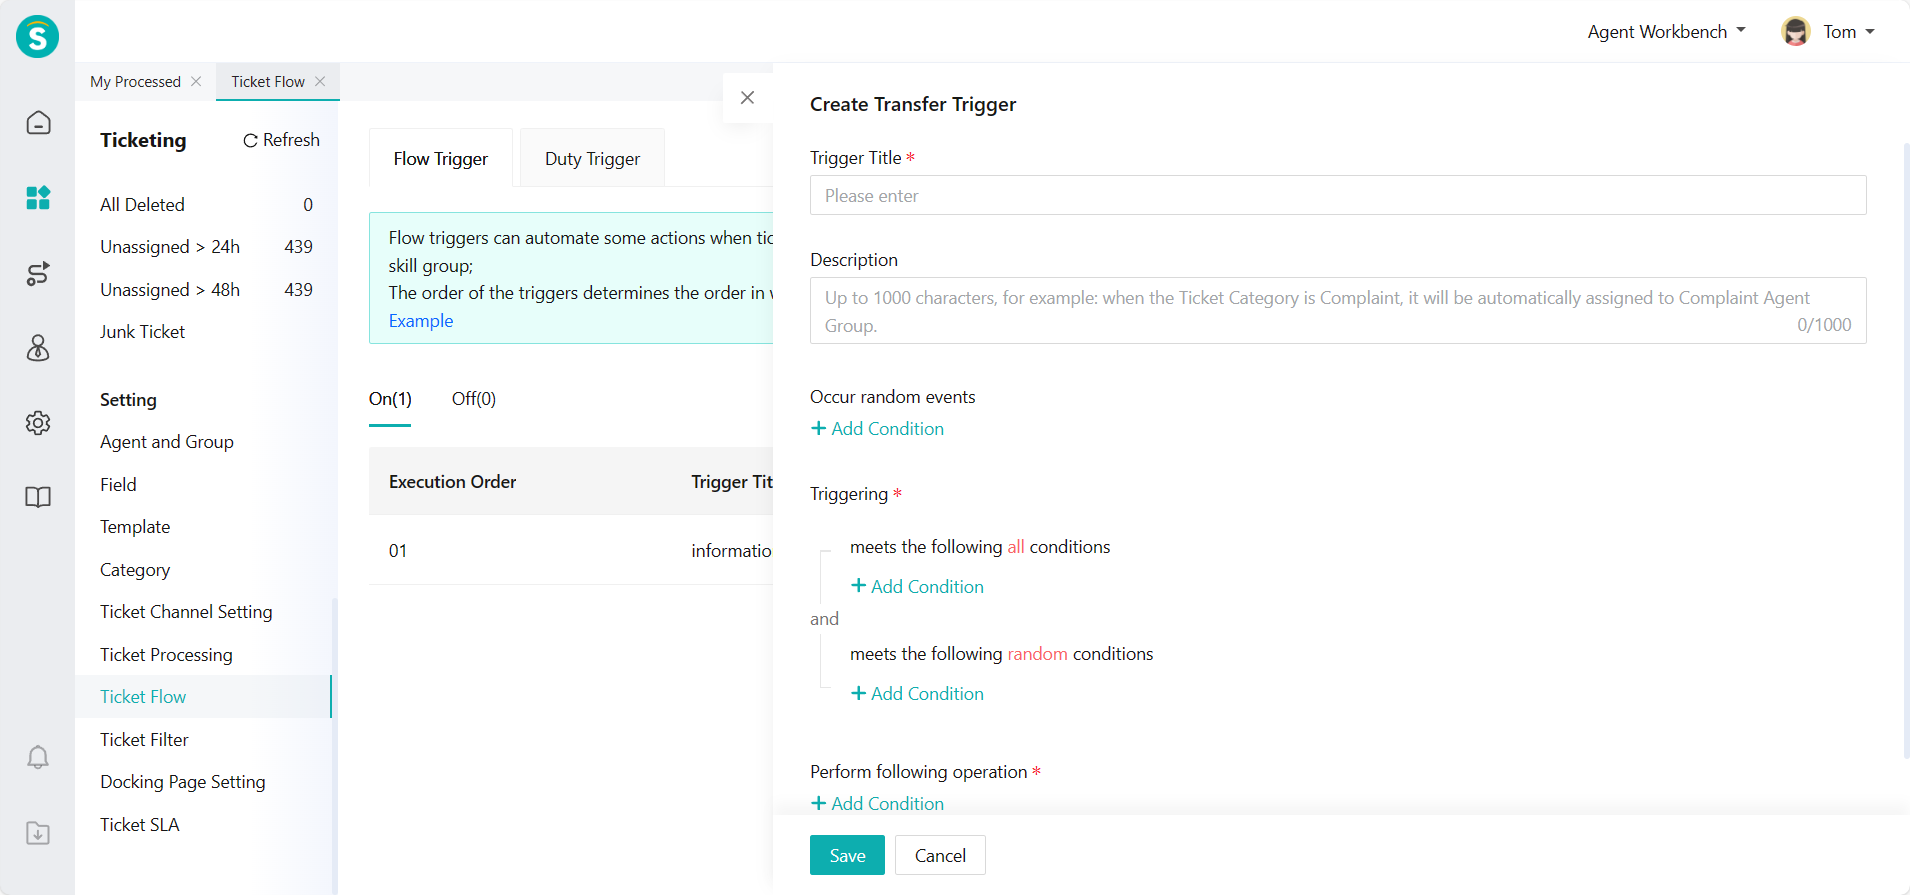
You can add a new trigger by clicking【+Create】via Ticket Center > Setting > Ticket Flow Setting > Flow Trigger/Scheduled Trigger page or copying a trigger, select a trigger event (not required for scheduled trigger, executed at every hour by default), add one or more trigger conditions, and set actions to complete the setting of a trigger.
# ● Relation of Trigger Conditions
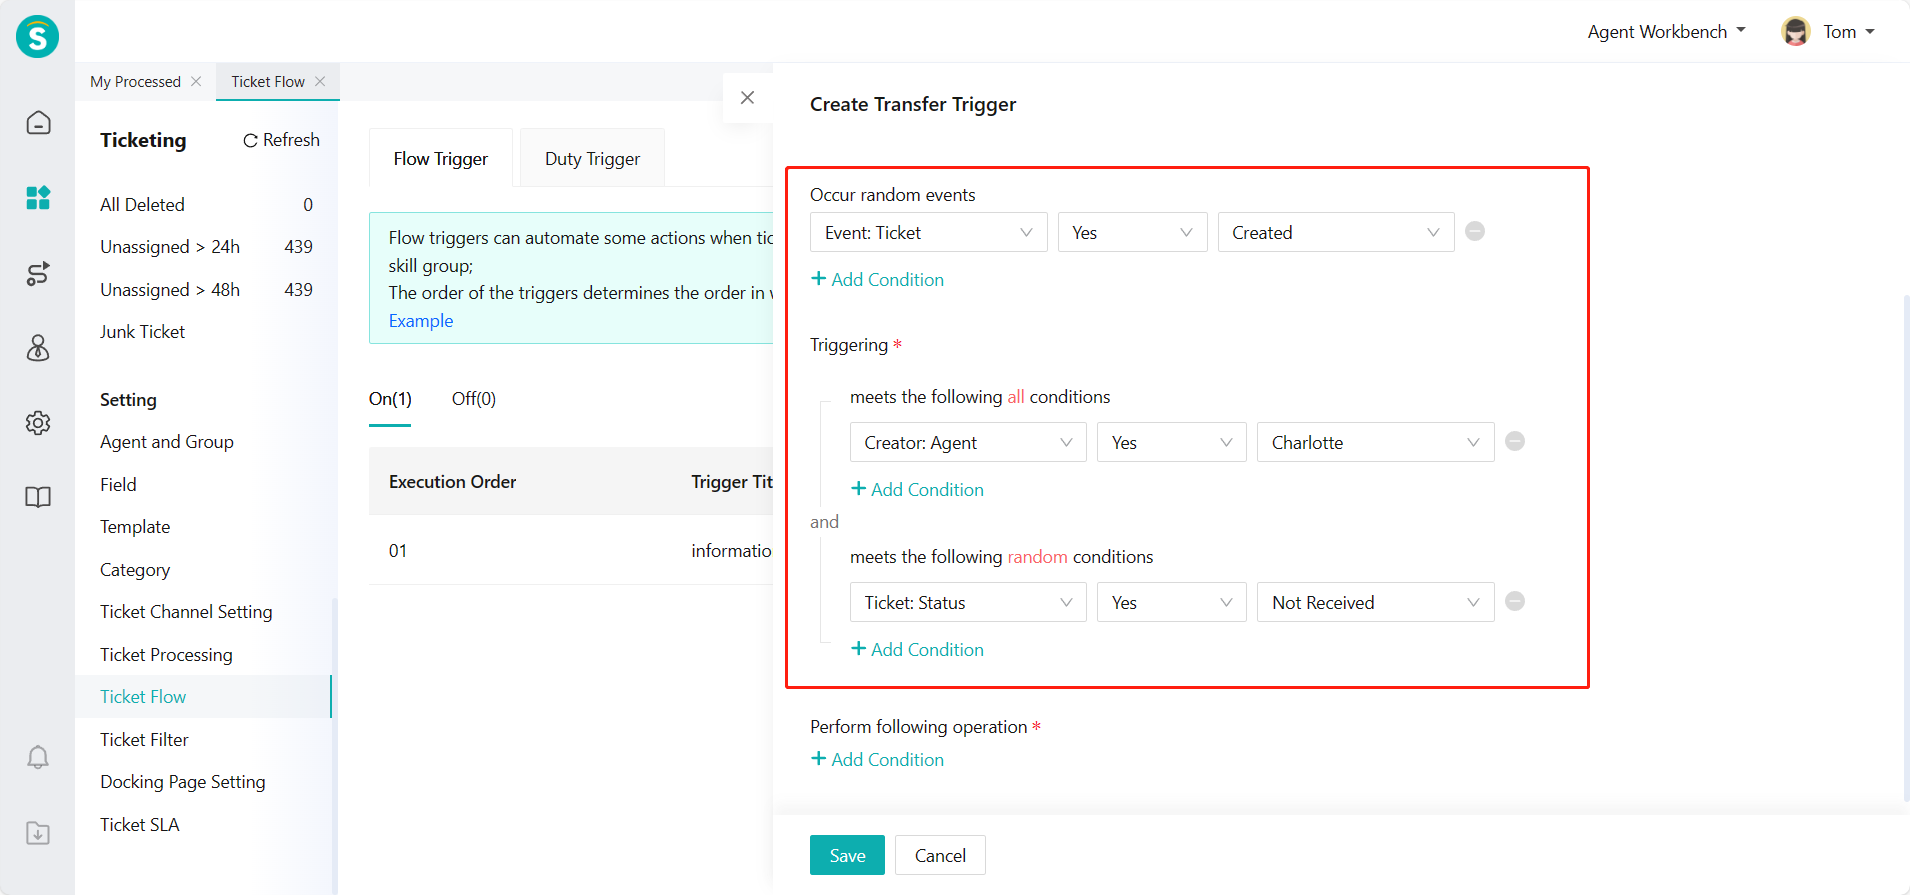
When you add multiple trigger conditions, the ticket must meet each of the【All Conditions】you add and at least one of the【Any Conditions】you add before it can be determined to meet the trigger conditions for action execution.
# Trigger Management
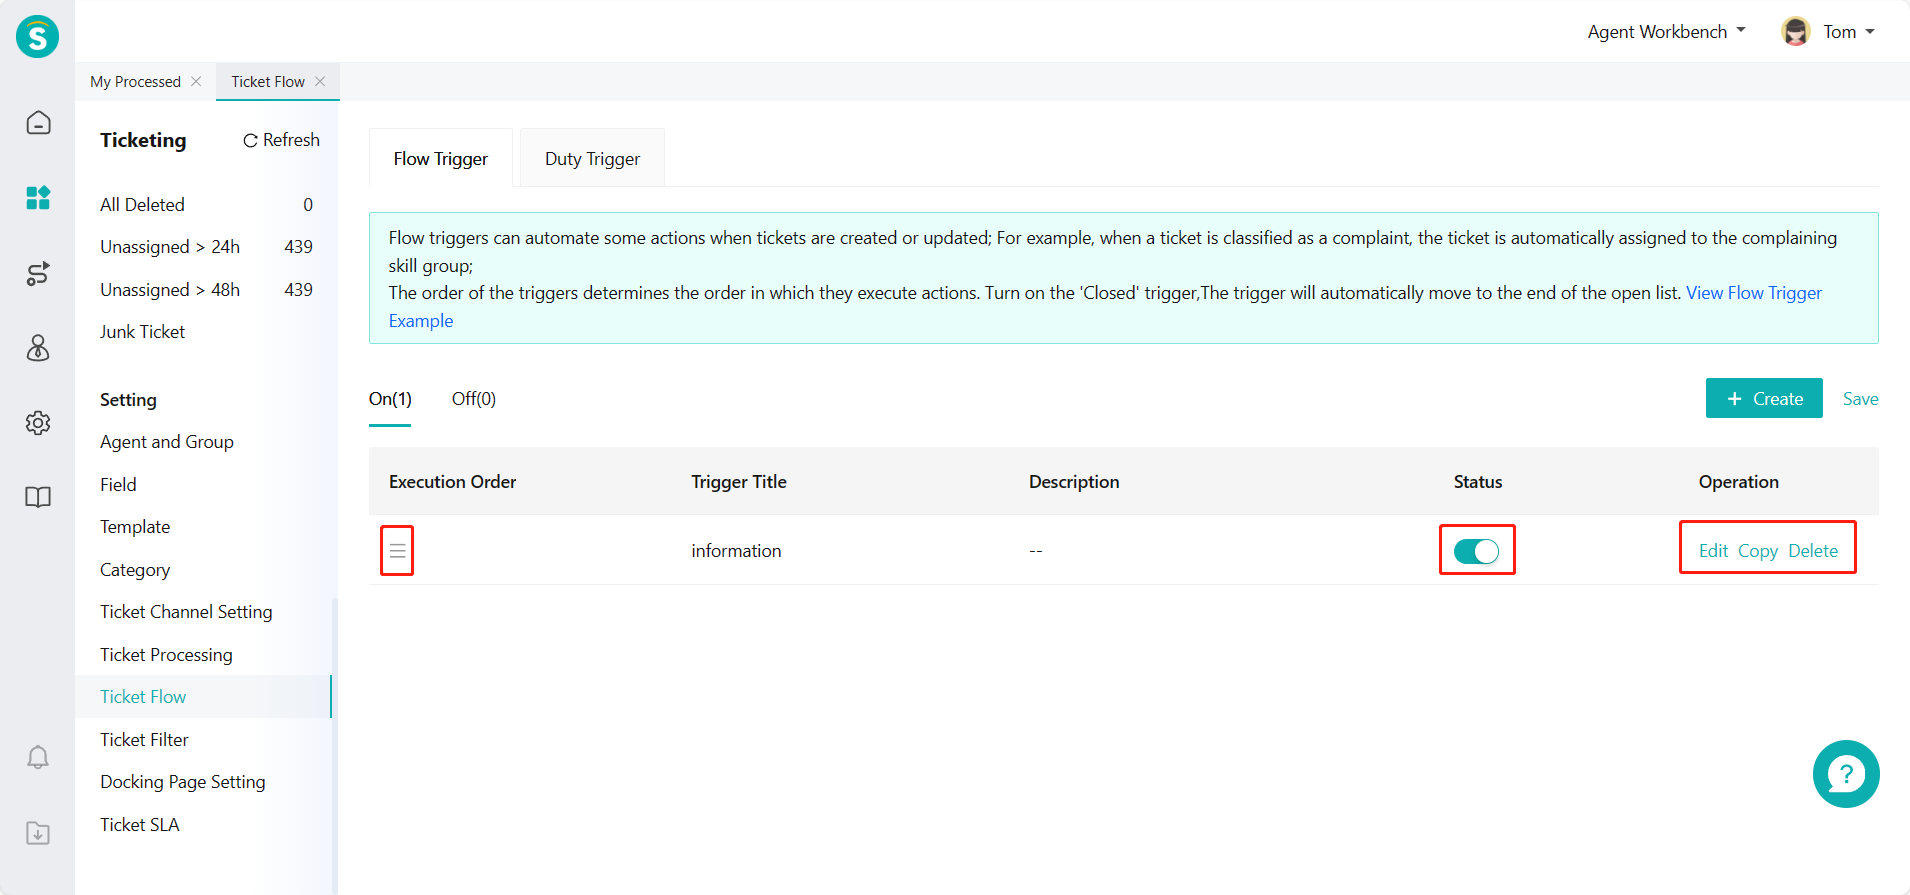
You can edit, sort, enable/disable, copy and delete triggers via Ticket Center >Setting >Ticket Flow Setting >Flow Trigger/Scheduled Trigger page.
# ● Sort
- You can activate the sorting status by clicking the sorting button on the right side of the reply list, and quickly sort by dragging the sequence tag on the left side of the reply, which will take effect after saving; 2. When multiple triggers are set, if the ticket meets multiple trigger conditions, it will be executed according to the sequence of the triggers.
# ● Enable/Disable
- After the trigger is disabled, the trigger will no longer take effect; 2. When a disabled trigger is enabled again, it will be added to the end of the enabled trigger list and executed according to the sequence of the triggers. If you want this trigger to be executed first, you need to adjust the trigger sequence.
# Difference Between Scheduled Trigger and Flow Trigger
The scheduled trigger can work in absence of events and will be executed according to the sequence of scheduled triggers at every hour of the server event. The trigger conditions and execution actions of the scheduled trigger are basically the same as those of a flow trigger.
# Flow Trigger Example
# ● Example 1
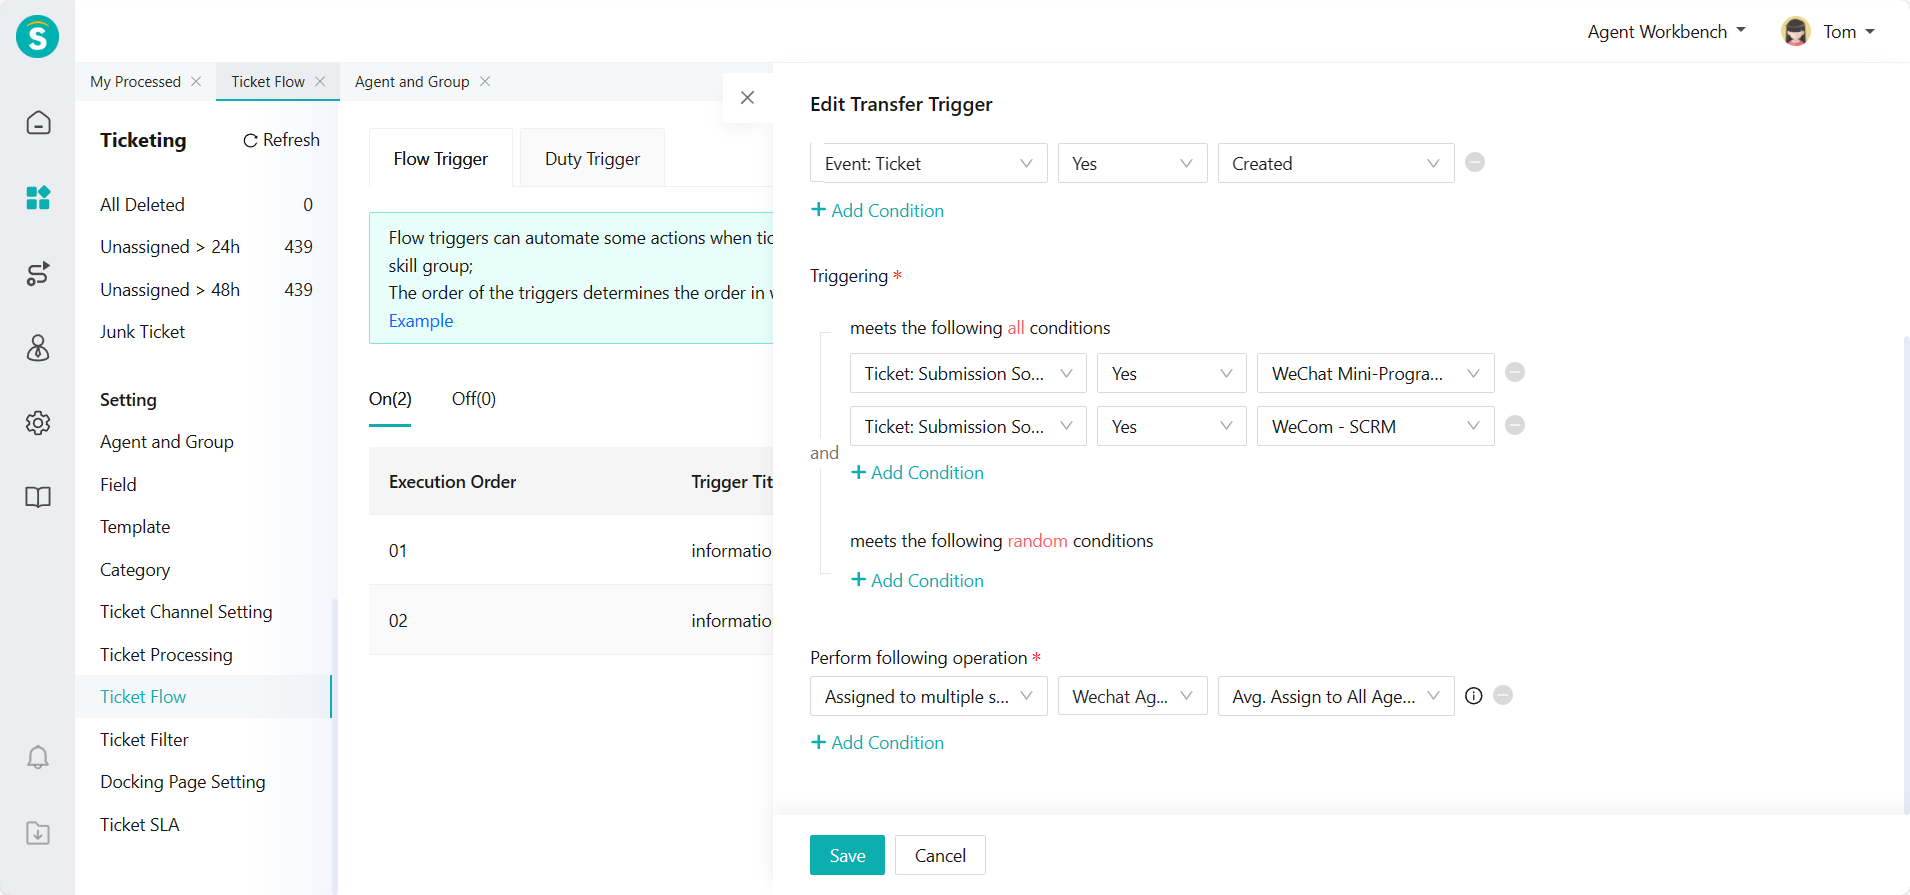
The flow trigger can help you automatically assign user submissions from different channels to different agent groups for processing;
For example, the tickets submitted by "WeChat" are assigned to the WeChat agent group for processing
- Trigger event: "Ticket" is "Created"; 2. Trigger condition: "Ticket: Submission Source" is "WeChat Official Account Submission" or "WeChat Mini-Program Submission"; 3. Execution actions: "Assigned to Agent Group", "WeChat Agent Group", and "Avg. Assign to All Agents";
# ● Example 2
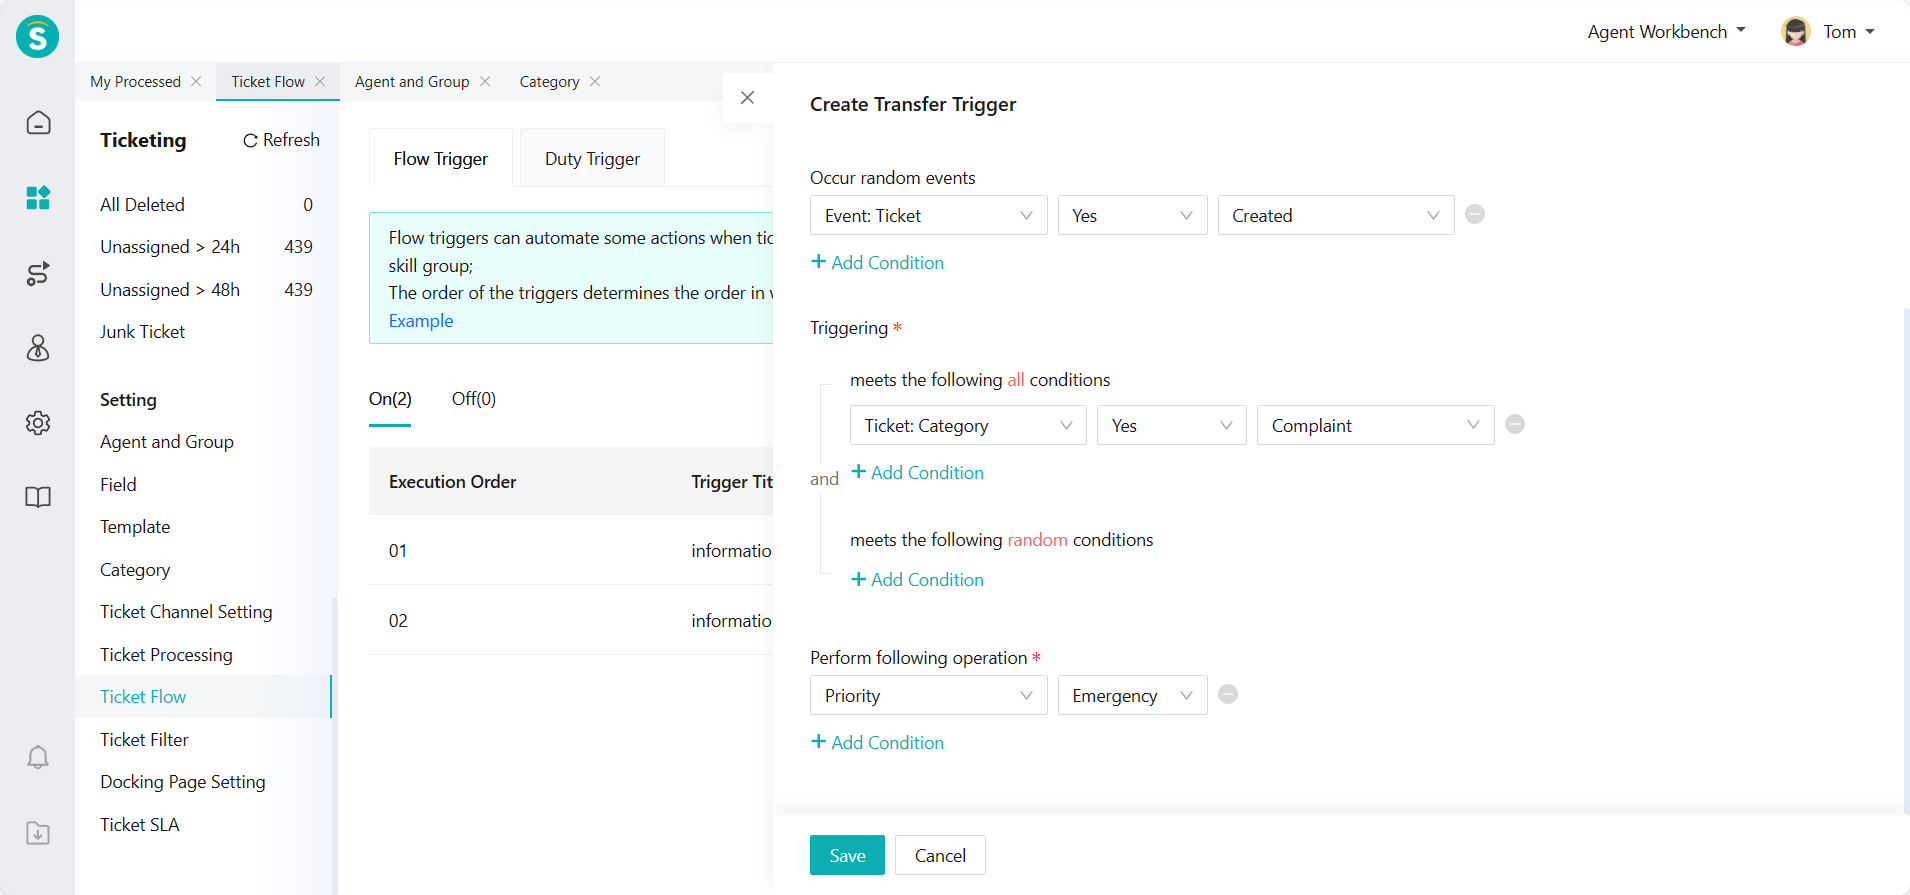
The flow trigger can help you automatically set the priority of ticket processing according to different ticket categories;
For example, the complaint ticket has the highest priority
- Trigger event: "Ticket" is "Created"; 2. Trigger condition: "Ticket: Category" is "Complaint"; 3. Execution action: "Priority" is "Urgent";
# ● Example 3
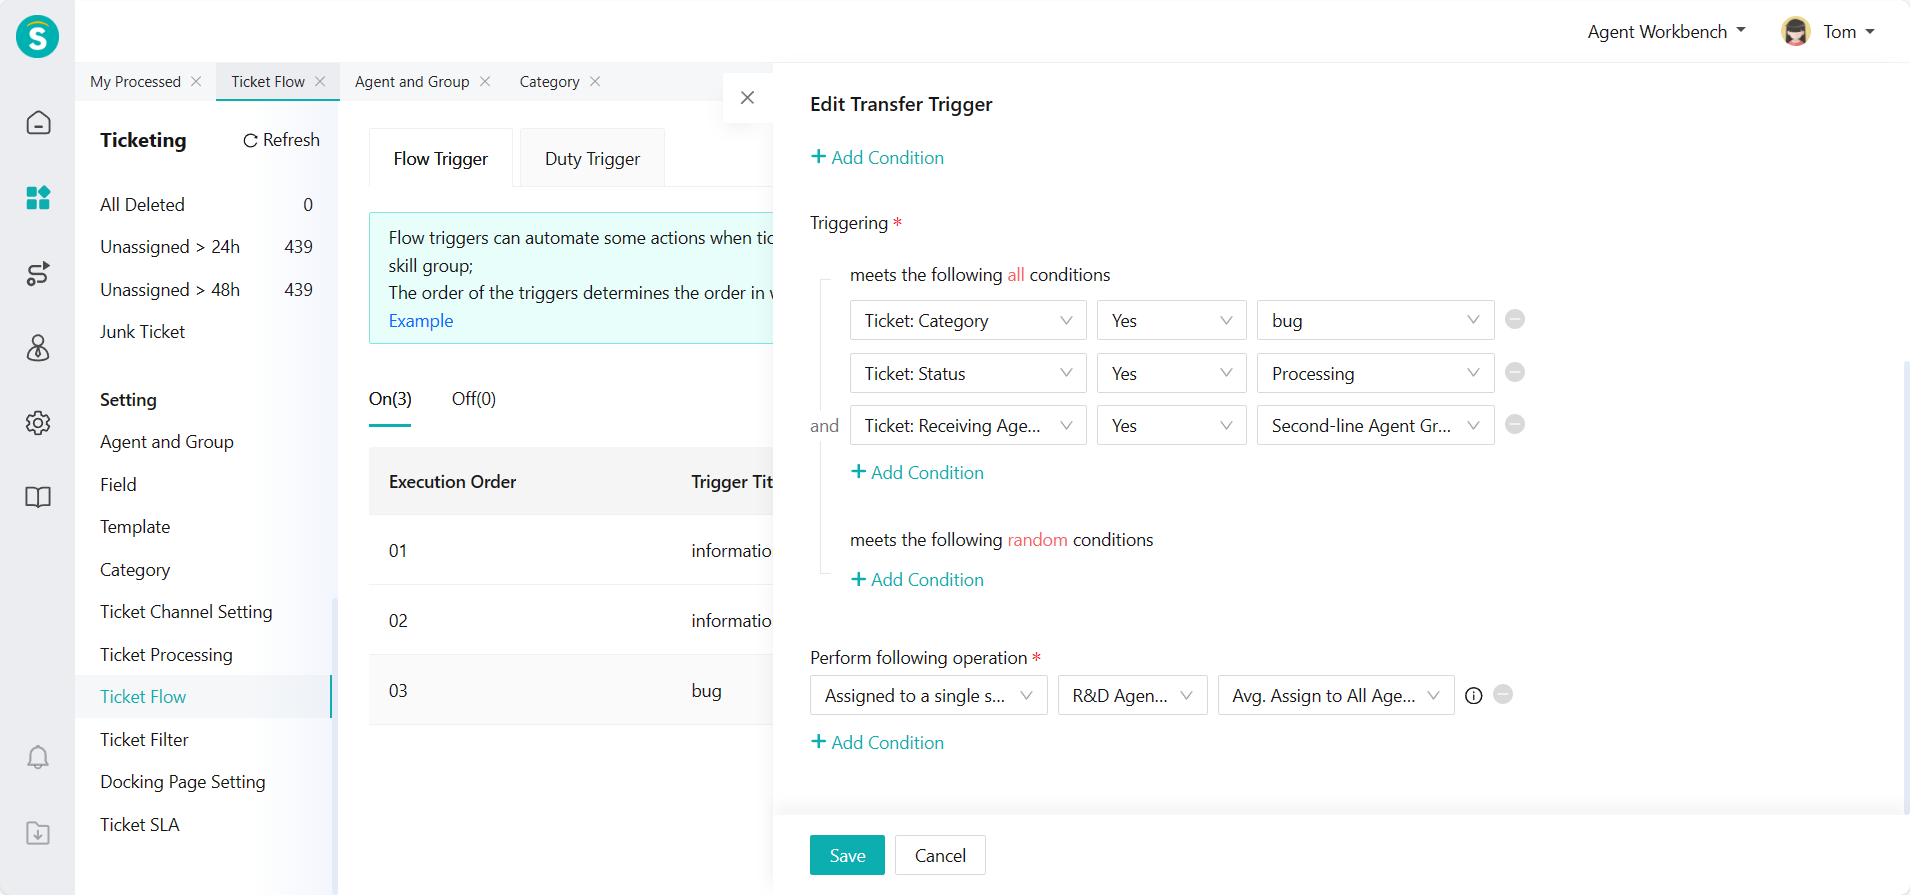
The flow trigger can help you realize the internal ticket flow in the enterprise, such as the internal flow of bug tickets. Flow path: The front-line agent creates a ticket after receiving the problem feedback —> the ticket is automatically assigned to the second-line agent, and the agent confirms whether the problem is a bug —> If it is a bug, it will automatically flow to the R&D team for processing; otherwise, the second-line agent will give a corresponding reply and close the ticket.
● Trigger 1: The bug ticket is assigned to the second-line agent group 1. Trigger event: "Ticket" is "Created"; 2. Trigger condition: "Ticket: Category" is "bug"; 3. Execution actions: "Assigned to" "Second-line Agent Group";
● Trigger 2: The second-line agent group assigns the bug ticket to R&D agent group 1. Trigger event: "Ticket" is "Replied"; 2. Trigger conditions: "Ticket: Category" is "bug"; "Ticket: Status" is "Processing"; "Ticket: Receiving Agent Group" is "Second-line Agent Group" 3. Execution actions: "Assigned to" "R&D Agent Group"
# Scheduled Trigger Example
# ● Example 1
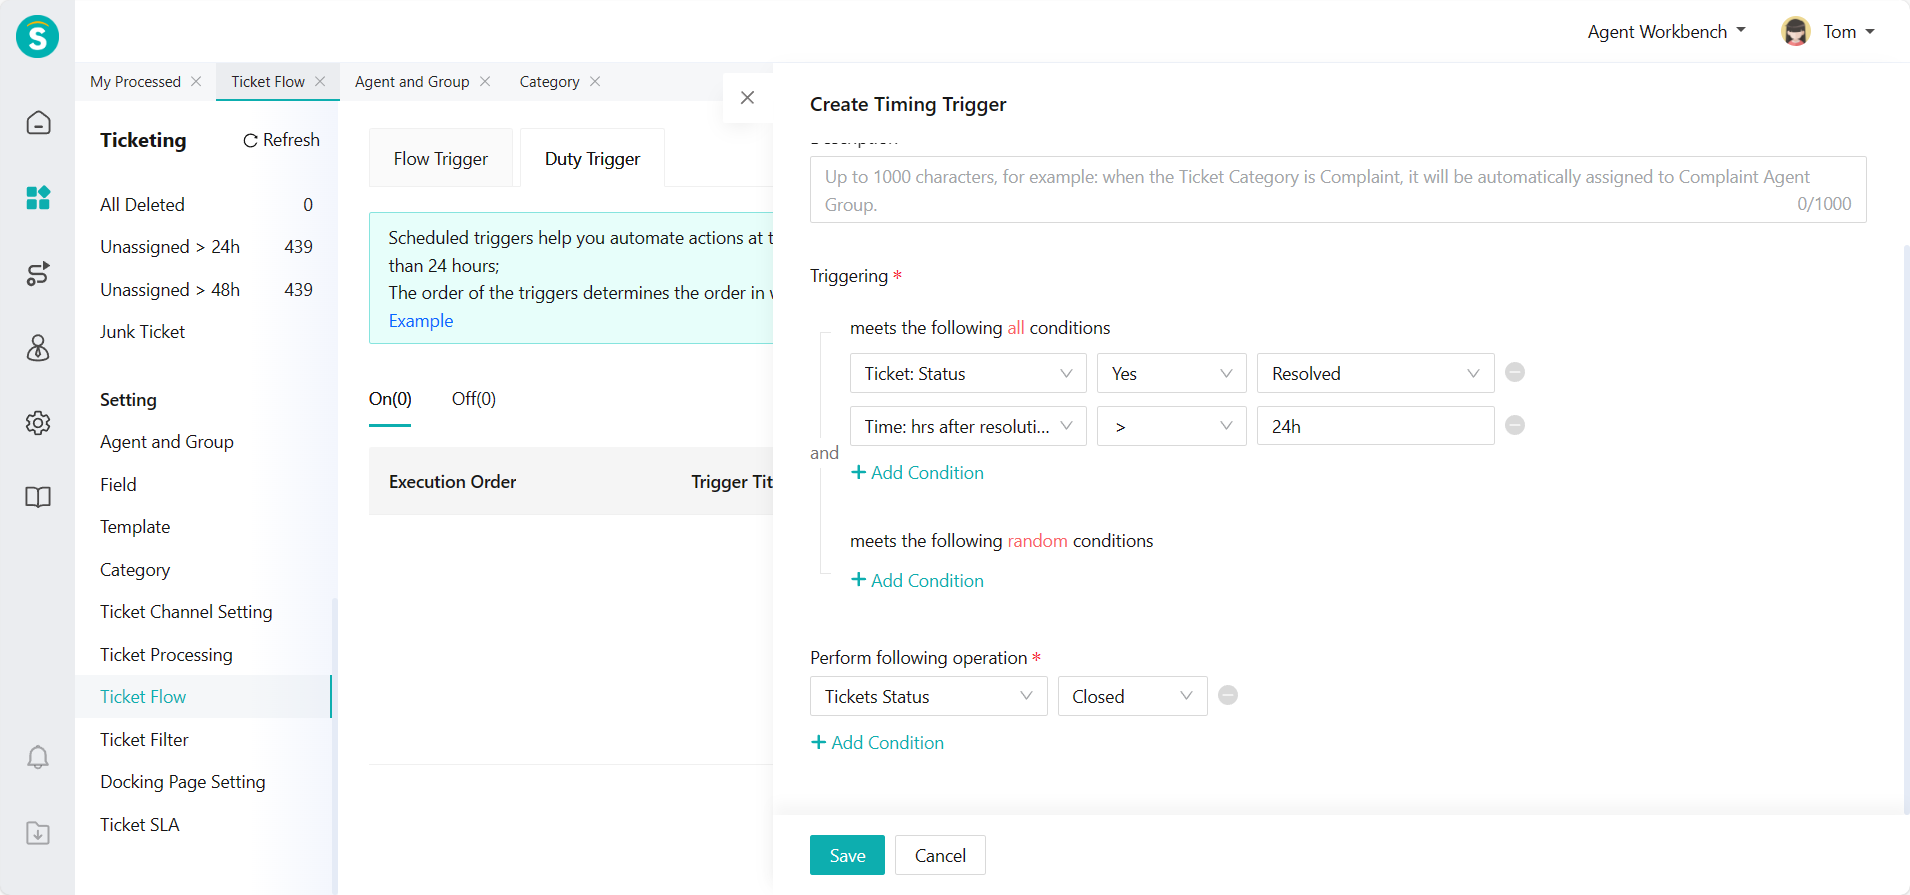
The scheduled trigger can help you automatically process some tickets at a fixed time. For example, the resolved tickets will be closed automatically after 24 hours
- Trigger conditions: "Ticket: Status" is "Resolved"; "Time: hrs after resolution" is greater than "24h; 2. Execution action: "Ticket Status" is modified as "Closed";
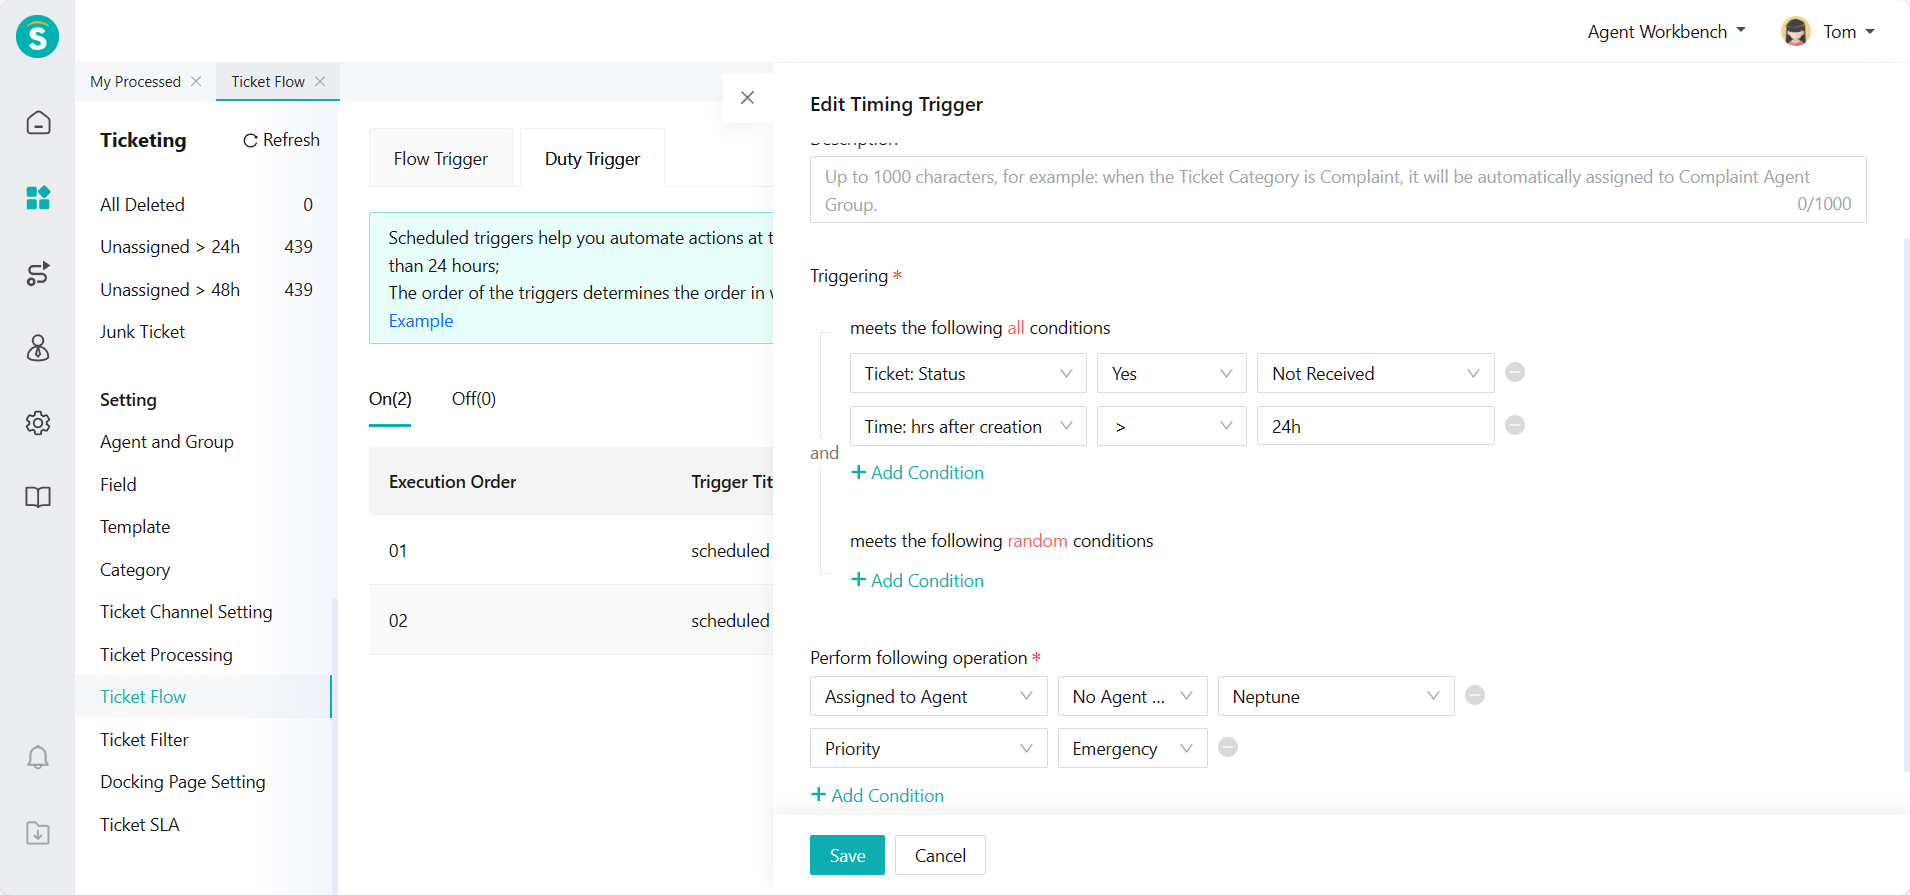
# ● Example 2
The scheduled trigger can periodically assign the tickets that have not been received to the designated handler;
For example, tickets that have not yet been received 24h after they are created will be assigned to the designated handler for processing, and the priority becomes urgent
- Trigger conditions: "Ticket: Status" is "Not Received"; "Time: hrs after creation" is greater than "24h"; 2. Execution actions: "Assigned to Agent" "Neptune"; "Priority" is modified as "Urgent";
# ● Example 3
The scheduled trigger can automatically assign the tickets that are not received periodically;
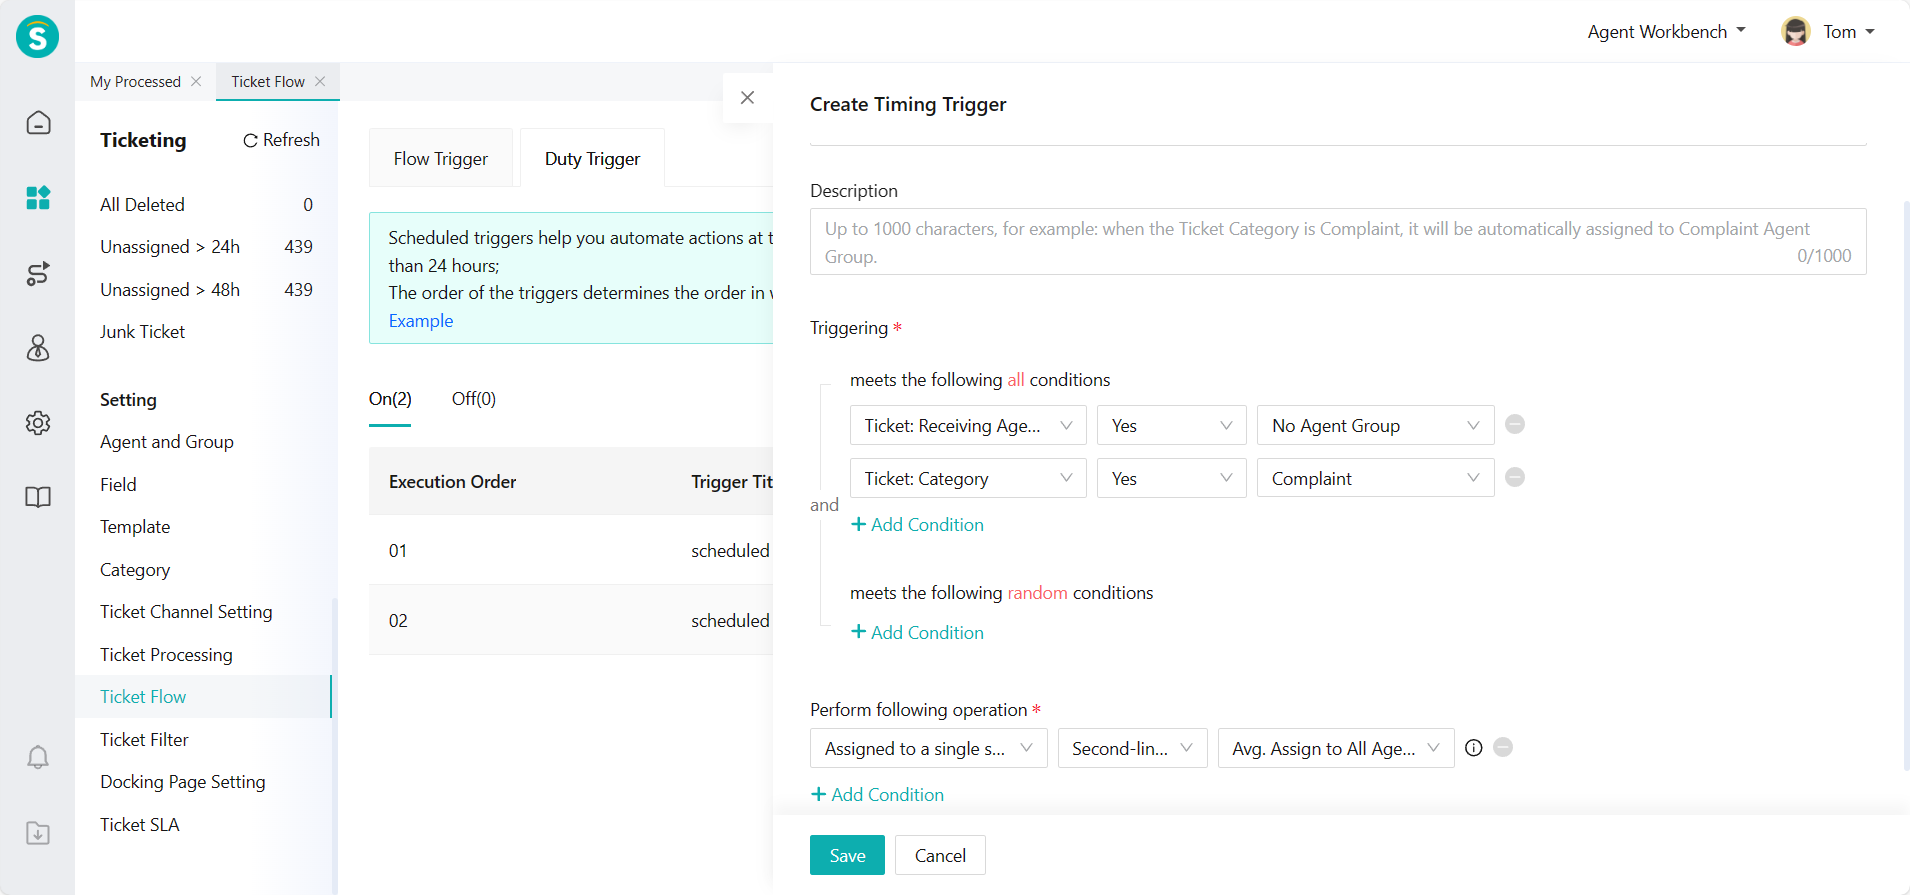
For example, the complaint tickets not assigned to the agent group will be automatically assigned to the second-line agent group for processing and received by the agents in the group
- Trigger conditions: "Ticket: Receiving Agent Group" is "No Agent Group"; "Ticket: Category" is "Complaint"; 2. Execution actions: "Assigned to Agent Group", "Second-line Agent Group";
